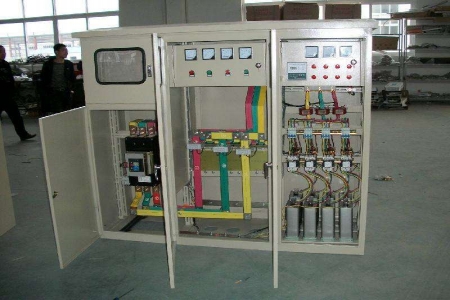
Switchgear High and Low Voltage Complete Test Bench AC380V
Operation Method:
1. Three-phase four-wire AC voltage 0-450V adjustable output
1.1 Connect the three-phase four-wire power supply to the power-on test bench, close the main power switch on the panel of the power-on test bench. At this time, the "Power Voltage" voltmeter indicates the power supply voltage. Turn the "Power Voltage" switch to observe the balance of the power supply voltage; rotate the voltage regulator handle counterclockwise to zero. "
1.2 After the above preparations are completed, press the "Close" button of the "AC Operating Voltage" unit, the red indicator light turns on, and the circuit is connected. Then press the "Close" button of the "Output Adjustment" unit on the lower panel, the red light turns on, the voltage regulator is energized, and rotate the "Output Adjustment" three-phase voltage regulator handle clockwise while observing the voltmeter of "AC Operating Voltage" until the required voltage value is reached; if 0-450V three-phase voltage output is needed, close the air switch next to the "Three-phase 0-380V Output" terminal on the rear wiring board; if AC operating voltage output is needed, close the air switch next to the "AC Operating Voltage" terminal on the rear wiring board, and close the air switch next to the "AC 220V" terminal on the rear wiring board to get 0-220V AC voltage output. After the test is completed, rotate the three-phase voltage regulator handle counterclockwise to zero voltage, and press the "Open" buttons respectively; the test is then completed.
2. Three-phase four-wire AC current 0-10A adjustable output
Connect the three-phase four-wire power supply to the power-on test bench, close the main power switch on the panel of the power-on test bench. At this time, the "Power Voltage" voltmeter indicates the power supply voltage. Turn the "Power Voltage" switch to observe the balance of the power supply voltage; rotate the voltage regulator handle counterclockwise to zero. "
2.1 After the above preparations are completed, press the "Close" button of the "Three-phase AC Current" unit, the red indicator light turns on, and the circuit is connected. Then press the "Close" button of the "Output Adjustment" unit on the lower panel, the red light turns on, the voltage regulator is energized, and rotate the "Output Adjustment" three-phase voltage regulator handle clockwise while observing the ammeter of "Three-phase AC Current" until the required current value is reached; rotate the "Three-phase AC Current" switch to read the three-phase currents separately. Note that the switch should not be placed in the "0" position at any time; when 0-10A three-phase AC current output is needed, also close the air switch next to the "Three-phase AC 0-10A" terminal on the rear wiring board. After the test is completed, rotate the three-phase voltage regulator handle counterclockwise to zero voltage, and press the "Open" buttons respectively; the test is then completed.
Switchgear High and Low Voltage Complete Test Bench AC380V
Technical Specifications:
>Input Power: Three-phase five-wire AC380V
>Output Voltage and Current:
①Three-phase AC100V output (3A, fixed value) One set of terminals
②Three-phase AC 0 - 10A output (10V, adjustable value) One set of terminals
③DC fixed output 24V, 36V, 110V, 220V (4A) One set of terminals
④AC operating voltage output AC 0 - 400V, at 220V, current less than 10A One set of terminals
⑤DC operating voltage output DC 0 - 250V (10A) One set of terminals
⑥DC closing power supply output DC 0 -250V (300A, short-time operation) One set of terminals (optional)
⑦Single-phase AC220V output (fixed value, socket form) Two sets of terminals
⑧Three-phase AC380V output (fixed value, terminal) One set of terminals
⑨Closing control contacts ⑤, ⑧ Opening control contacts ⑥, ⑦
>Dimensions: 650X750X1100mm3